Upcycle a Denim Jacket with a Thrifted Blanket
- Radha
- Apr 20
- 6 min read

If it had been in good shape, this vintage Mexican Saltillo Sarape would have been highly desirable, and I never would have cut it up. But unfortunately, by the time it arrived at Scrap SF, it was stained and almost disintegrating across multiple sections. But I knew I needed to save the parts that I could.

I'm going to walk you through how I turned it into a cool log cabin quilt block and then attaching it to a denim jacket in a totally unique way. But before we begin, you might be wondering...
What if I don’t have the exact same thrifted blanket with stripes??
Well, this tutorial will work with any medium-weight fabric you can cut into strips! Quilting cotton, denim, canvas, thrifted pair of khakis, vintage pillowcase, whatever you have on hand.
Where did you thrift your vintage blanket?
I was volunteering at Scrap SF, a creative reuse center, and someone donated this vintage blanket while I was there. We weren’t sure anyone would want it because of the condition it was in, but I saw the potential.
Is there a creative reuse center near me?
I don’t know, but you can check this map: Thrift Your Fabric

What You’ll Need
Vintage Blanket (or whatever you have): look for one with interesting colors, even if it’s a bit ratty.
Denim Jacket: This is where your quilt block will go.
Batting: it’s possible to skip this, but I really like the extra 3D effect when you add this behind your quilt block.
Sewing Machine: Preferably with a walking foot, if you have one.
Denim Needle: optional. Otherwise use a new, sharp size 90.
Heavyweight Thread: I like using Aurifil 40-weight thread for its durability.
Pins: For holding your layers in place while you sew.
Scissors/Cutting Tools: To cut strips and trim materials as needed.
Prepping Your Material
Whether you are using something thrifted, from your closet, or new, you will want to wash it before you start this project. If the item is stained, soaking in a tub with OxiClean works great. But be aware: if this is a vintage blanket, the color may run the minute it touches water.
I knew the colors in vintage blanket would run, but based on the condition issues, I also knew it needed to be gently cleaned.

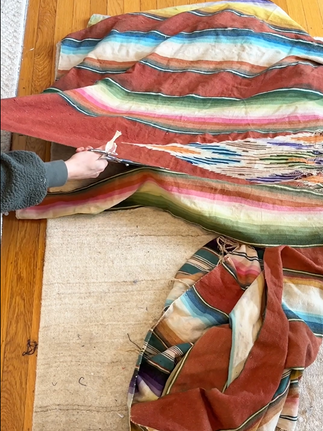
Cutting Strips
This part is really dependent on what item you are using and is up to your own taste. But here is how I did mine:
I loved the stripes in my blanket, but I didn’t want them to stay in their original order. And I wanted to re-imagine the colors for that classic log cabin quilt block look where one half is light and the other is dark.
Using my fabric scissors, I carefully cut long strips from the blanket, making sure to salvage pieces that didn’t have holes or heavy stains, and kept them in color groups with contrasting lights and darks
Note: you can use a rotary cutter if that works for your item and space, but because the blanket was so big, I found that using a scissor on the floor worked best for me.
Then I was able to use a rotary cutter to cut those strips into smaller strips, separating the lights and darks. I ended up with strips that were about 2” wide.


Creating the Log Cabin Block
If you’re new to log cabin blocks, don’t worry, this is one of the easiest quilt blocks to master. Essentially, you’re building a spiral of “logs” (those colored strips) around a rectangle (or any starting shape).
How to start:
Start with a Base, either a square or rectangle.
Add Your First Log: Attach one log (strip) to one side of the base.
Then add a second log to the next side of the base.
Keep the Spiral Going: Continue attaching logs around your block. You can make it as large as you want by continuing to add logs.


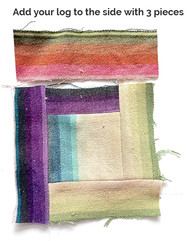
What if you get lost and forget what side you are supposed to be attaching your log to?
You always attach your log to the side with three pieces!
The resulting “steps” look especially striking when you alternate between light and dark colors. I love how this method gives a cool graphic look that’s both traditional and unexpected when using reclaimed materials.

Placement & Prep
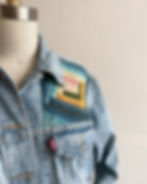
Now comes the fun and creative part—attaching your finished quilt block to your denim jacket. Instead of doing it the usual way, I opted for a more organic look by angling the block so it appears to “jump” over the jacket’s thick flat-fell seams. Here’s the process I followed (I recommend watching the video above):
Place the quilt block on top of the jacket to decide where you want it to sit and what side should be up.
Turn the block at an angle so at least one of the corners is going over one of the seam lines on the back of your jacket.
Identify the areas where the block will “jump” over the seams. I chose the top and one side. I left the left corner to cover the seam, but you can do all the corners if you want.
Turn under the corners of the quilt block and press the folded areas really well.
Remove the block and use a rotary cutter to carefully cut off one corner at the fold. This might seem a little scary at first, but trust me, you’ve got this!
Repeat the process on the other corner.


Batting & Pins
As I mentioned in the materials list, you don’t have to use batting, but I strongly
recommend it for the added texture and loft it gives the jacket.
Cut a piece of batting exactly the same size as your quilt block (normally you might cut batting a bit larger, but since this is going to be quilted directly to the jacket, it needs to match perfectly).
Cut separate pieces for the two little triangles you removed, again making sure they are the exact size of the piece you cut off.
Layer the quilt block and batting pieces with the jacket in the corresponding areas, the same way you would sandwich a quilt.
Pin everything down! With everything positioned, start pinning the quilt block and batting in place. I ended up pinning like crazy. Safety pins might be a better choice if you want to avoid any accidental pricks, but I used what I had on hand. You could also use a basting spray or you could hand baste the layers together.


Sewing it all together
With your pieces prepped and pinned, it’s time to quilt your layers together on your machine.
Could you quilt it by hand? Anything is possible. However, hand-sewing denim can be hard on your wrists, and since the edges have not been bound, I use a zigzag stitch on the machine to secure and finish the piece.
Machine Set Up:
Walking Foot: if you have a walking foot, make sure to use it. It’s a lifesaver when working with multiple layers.
Denim Needle: Use a Denim Needle if you have one. I don’t always use one, but a denim needle works wonders when sewing through heavy layers, and is especially helpful if you are going to quilt over a flat-fell seam. You can also use a new, sharp size 90 or other stronger needle.
Thread: I prefer a heavier weight thread like Aurifil 40-weight, but any heavier weight will work.
3-Step Process:
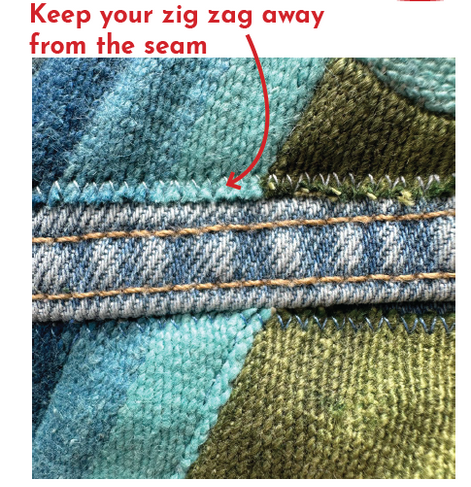
I quilted this block using a 3-step process that started with securing the block using a straight stitch, then securing the edges with a zigzag, and then finishing the quilting by adding additional straight stitches throughout the block.
Step 1:
Using a medium length straight stitch (I used a 3 on my BERNINA), Sew a couple straight lines in the middle of the block and close to the edges, to keep the block in place.

Step 2:

Using a tight zig zag stitch, stitch around every raw edge of your block, including the triangles. Depending on the look you want, you can make the zig zag as tight as you want. The tighter the zig zag, the less fraying you will have. I chose to keep my zig zag loose, because I wanted the extra texture of the fraying.
Don’t try to zig zag over the flat-fell seams! Keep your stitches on either side of the seam.


Step 3:
Returning to your straight stitch, add as many additional quilting lines as you want! With a log cabin block, you can either “stitch in the ditch” which will hide your quilting lines, or make quilt lines that cut through your block creating additional texture.
For this project I did both, but there is no right or wrong way to do it!

Final Thoughts
These ideas and techniques can be used for so many materials. You can turn almost anything into a quilt block, and that quilt block can go on almost anything! I followed this same process to make a mini log cabin block for the front of my jacket, but you could also add this to a tote bag, a sweatshirt, an existing pillow or any fabric item you can think of!
This project is all about embracing imperfections, re-imagining materials, and having fun with your creativity. So, I hope this has inspired you to take a leap and try something new!